The Process
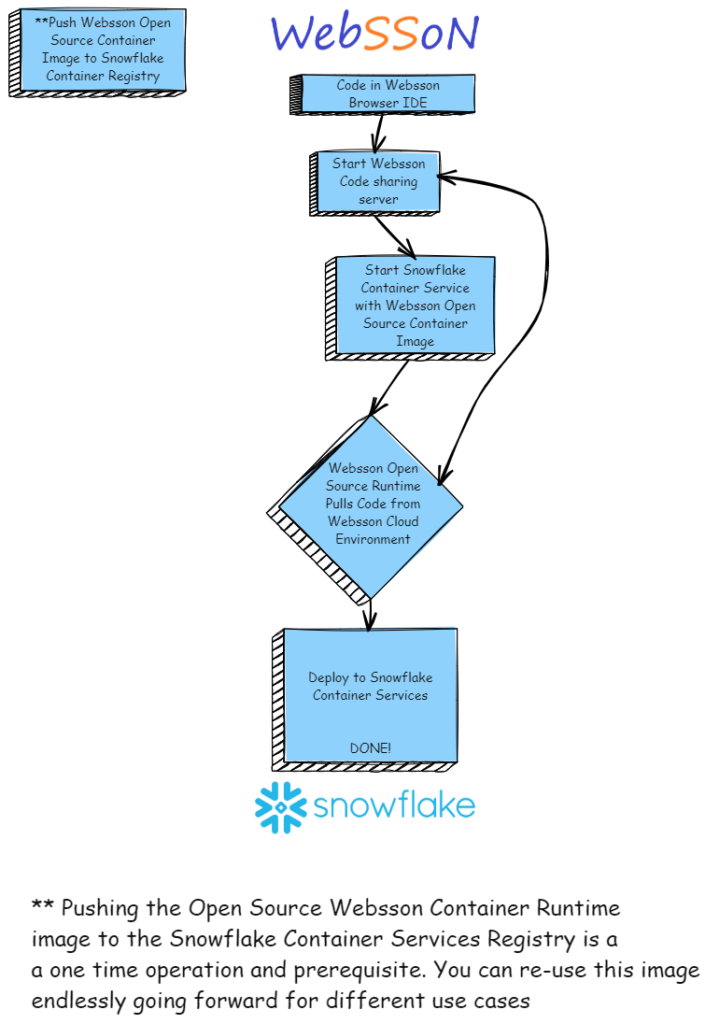
From the Websson Cloud IDE straight to Production in Snowflake Container Services

The Process:
As a first step we need to upload the Websson Open Source Python Container Runtime (a Docker image) into your Snowflake container registry. In order to do that we need to download the image from the Docker Hub first:
docker pull websson/code-and-ship-on-python
After the image download to your workstation or server we can now go ahead and create and prepare a Snowflake image registry as well as prepare everything else that we need to start running this container, such as creating compute pools and uploading the image.
Fortunately this is a one time operation as the Websson Runtime Image can be re-used for different use cases and apps over and over again, as it is literally a platform.
Head over to your Snowflake accout and create an SQL worksheet with the following contents:
create role webssontest;


grant role webssontest to user xxx;

use role webssontest;

create  database websson_db;
create schema websson_schema;

CREATE OR REPLACE WAREHOUSE websson_wh WITH WAREHOUSE_SIZE='X-LARGE';


grant usage on WAREHOUSE websson_wh  to role ACCOUNTADMIN;
grant operate on  WAREHOUSE websson_wh to role ACCOUNTADMIN;

use role ACCOUNTADMIN;

CREATE COMPUTE POOL websson_compute_pool
  MIN_NODES = 1
  MAX_NODES = 1
  INSTANCE_FAMILY = CPU_X64_XS;

show compute pools;

--alter compute pool WEBSSON_COMPUTE_POOL suspend;
--alter compute pool WEBSSON_COMPUTE_POOL resume;

use role webssontest;
  CREATE IMAGE REPOSITORY IF NOT EXISTS images;


  USE ROLE ACCOUNTADMIN;
alter user xxx set mins_to_bypass_mfa=60;

use role webssontest;
 SHOW IMAGE REPOSITORIES IN SCHEMA;
Now you should be able to see the name and url of your image repository that we can now use to rename and upload the Websson Python Runtime Image into:

Here you can see the repo url which we can now use tag the downloaded Websson image with in Docker. You see the image url which has the structure beginning with your account-identifier.registry.snowflakecomputing.com/database/schema/image-repo-name/image-name:latest.
So my example this results in:
xxxx-xxxx.registry.snowflakecomputing.com/websson_db/websson_schema/images/websson-image:latest
Which results in my case that I have to tag the image as following in order to upload it:
docker tag websson/code-and-ship-on-python xxxx-xxxx.registry.snowflakecomputing.com/websson_db/websson_schema/images/websson-image:latest
In order to upload the image we need to login to your Snowflake image repository with the Docker client.
Please make sure to turn off MFA if you have that enabled for your user, for this operation, as the MFA will get in the way of uploading the image.
As reminder this is the command in Snowflake to disable MFA temporary:
  USE ROLE ACCOUNTADMIN;
alter user xxxx set mins_to_bypass_mfa=60;
Back in your terminal now you can login with your username and password to the Snowflake image registry. Here is a example how I would have to login. The url is the image registry url minus the database and schema path:
docker login xxxx-xxxx.registry.snowflakecomputing.com
One you have logged in sucessfully and tagged the image correctly, now you can upload the image as usual with Docker push:
docker push xxxx-xxxx.registry.snowflakecomputing.com/websson_db/websson_schema/images/websson-image:latest
With the Websson Python Runtime image now available in your Snowflake account we can now go ahead and start deploying Python apps directly into the container from the Websson Cloud IDE or Git. So let’s deploy a simple “Hello World” Flask app without Git for starters.
For that we need to get our compute pools and external access integrations in Snowflake configured so that our container image has access to the internet. Here is how to prepare this:
USE ROLE ACCOUNTADMIN;
GRANT BIND SERVICE ENDPOINT ON ACCOUNT TO ROLE webssontest;

CREATE NETWORK RULE allow_websson_rule
  TYPE = 'HOST_PORT'
  MODE= 'EGRESS'
  VALUE_LIST = ('0.0.0.0:443);


CREATE EXTERNAL ACCESS INTEGRATION allow_websson_eai
  ALLOWED_NETWORK_RULES=(allow_websson_rule)
  ENABLED=TRUE;

GRANT USAGE ON INTEGRATION allow_websson_eai TO ROLE webssontest;

use role webssontest;

use role accountadmin;

CREATE   COMPUTE POOL IF NOT EXISTS DOCKER_COMPUTE_POOL
  MIN_NODES = 1
  MAX_NODES = 1
  INSTANCE_FAMILY = CPU_X64_S
  AUTO_RESUME = true;

  DESCRIBE COMPUTE POOL websson_compute_pool;

 -- DROP   COMPUTE POOL websson_compute_pool;

  show compute pools;

grant usage on compute pool websson_compute_pool to role webssontest;

grant operate on compute pool webson_compute_pool to role webssontest;

grant monitor on compute pool webssontest_compute_pool to role webssontest;

grant modify on compute pool webssontest_compute_pooll to role webssontest;

grant usage on warehouse compute_wh to role webssontest;

grant all privileges on database websson_db to role webssontest;

grant all privileges on schema websson_schema to role webssontest;

use role webssontest;

  DESCRIBE COMPUTE POOL webssontest_compute_pool;

  alter COMPUTE POOL webssontest_compute_pool resume;
With this a small compute pool with the name webssontest_compute_pool is started.
It takes a while to start up so you may want to check using this command:
DESCRIBE COMPUTE POOL webssontest_compute_pool;
Every now and then until the pool is in “idle” status.
Then we can move on to the next step to run and deploy the Flask “Hello World” app directoy from Websson.
For that we actually need to first prepare the app code in a Websson Cloud Environment.
If you do not have a Websson environment, you should get one, it makes coding and building things really easy and it has a free tier:
So go into your Websson Python environment and git clone this repo:
git clone https://github.com/websson/websson-deploy-samples.git
Change directory in the terminal to the hello_world_flask example:

cd /home/websson/websson_deploy_samples/hello_world_flask
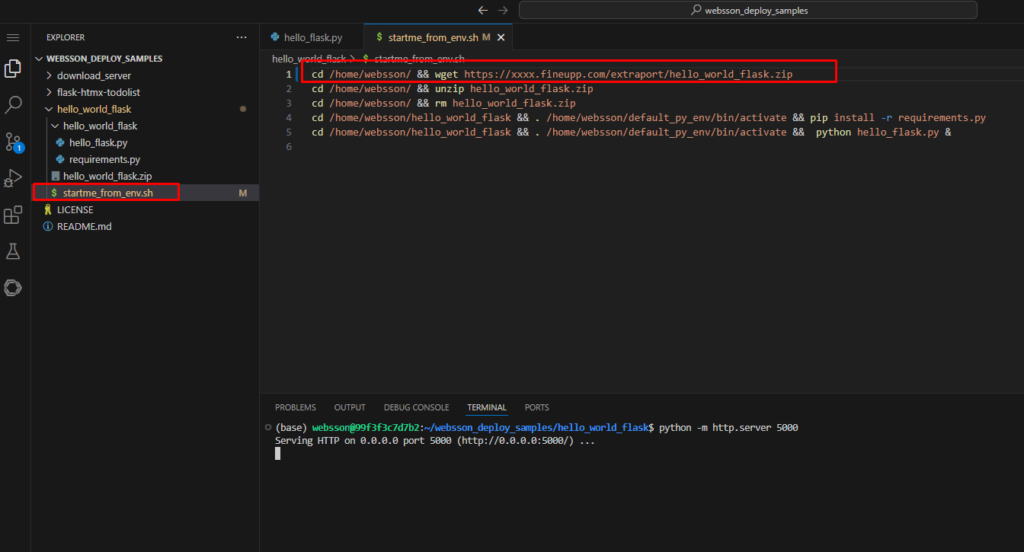
Here we need to prepare 2 things. We have to edit the start_me_from_env.sh script to point to your Websson Cloud IDE instance URL plus we need to start a simple HTTP server on port 5000 with Python to make our code retrievable by Snowflake. So in your VSCode Web instance in Websson go ahead and open the websson_deploy_samples folder and edit the file start_me_from_env.sh:

Change the xxx part of the Websson provided URL to your actual instance.
For example:
https://fourmore-porttest3.hetz-fsn-prod-1.fineupp.com/extraport/hello_world_flask.zip
The fineupp.com and the “extraport” part of the URL are standarized, while the actual Websson instance needs to be adapted plus the payload or files you want to offer for download need to be added at the end.
In this case we will use the prepared Flask Hello World ZIP file that is already in the Git folder.
Go check out the code if you like. Change some things and zip the file up again.
But for now we can just take what is already provided for your quickstart.
Once you have changed the URL do your actual Websson Environment URL you need to start a Python HTTP server on port 5000 in the hello_world_flask folder as follows:
python -m http.server 5000
Now we can go back to the Snowflake worksheet , spin up the Websson Python Runtime and have it download and run that code in the Snowflake Container Service.
So back in your worksheet in Snowflake let’s spin up the service.
Here is the SQL to do that.
Remember the URL you needed before for your Websson Environment?
You will need it again now so Snowflake can download the deploy and download script necessary to grab and run the code.
					CREATE SERVICE websson_service
  IN COMPUTE POOL websson_compute_pool
  MIN_INSTANCES=1
  MAX_INSTANCES=1
  EXTERNAL_ACCESS_INTEGRATIONS = (allow_websson_eai)
  FROM SPECIFICATION
  $$
   spec:
    containers:
    - name: "pythonplatform"
      image: "/websson_db/websson_schema/images/websson-image:latest"
      env:
        SERVICEURL: "https://xxxx.xxx.com/extraport/startme_from_env.sh"
        SSHKEY: "False"
        SUPERVISOR: "False"
        VSVERSION: "1.93.0"
        USERPASS: ""
        ENVNAME: "testing"
        JUPTOKEN: "juptoken"
        VSTOKEN: "secret"

    endpoints:
      - name: http
        port: 5000
        public: true
      - name: vscode
        port: 3000
        public: true

  $$;
Snowflake will now spin up a container of the open source Websson Python Runtime, which will download the startme_from_env.sh script from your Websson Cloud Environment and execute it.
The script in turn will download the zip file with the Flask code and install the necessary dependencies (Flask) in the default Python Virtual Environment in the Websson runtime and start the Flask app.
With this setup will also startup a VSCode web instance so you can explore the code or make temporary changes for fun.
As we are not using a volume these changes will not be persisted though!
We can add volumes in the next post.
Fow now let’s see how we can can now see the Flask app in action and watch the progress of things.
Add those following SQLs to your Snowflake worksheet:
GRANT SERVICE ROLE websson_service ALL_ENDPOINTS_USAGE TO ROLE webssontest;

describe service websson_service;

--drop service websson_service;

--alter service websson_service suspend;
--alter service websson_service resume;

SHOW SERVICE CONTAINERS IN SERVICE websson_service;

SHOW IMAGES IN IMAGE REPOSITORY images;


CALL SYSTEM$GET_SERVICE_LOGS('websson_service', '0', 'pythonplatform', 1000);


SHOW ENDPOINTS IN SERVICE websson_service;
With the first command you grant your role and user access to the public URLs / endpoints Snowflake will now create for the Flask and VSCode apps.
The describe command will show you if the container has started or is still in “pending” status.
Once the container is in “running” status you can check out the logs with the SYSTEM$GET_SERVICE_LOGS command provided.
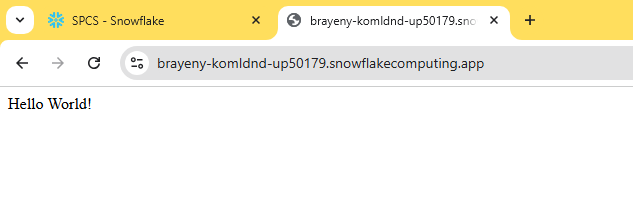
Most importantly is the SHOW ENDPOINTS command which will display you the URLs where you can reach the Flask Hello World app and the VSCode web app.
Sometimes it takes a while for those endpoints to become available, so repeat the command until the endpoints are deployed and then you can copy and paste them into your browser and check the result after you have authenticated your user with Snowflake as usual:


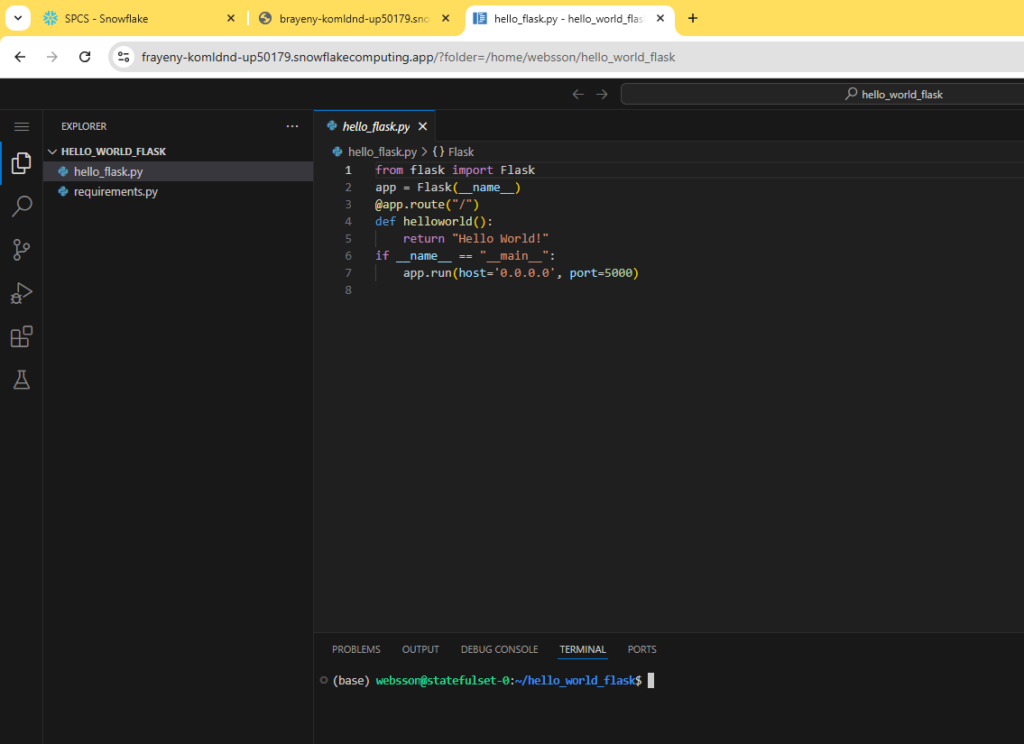
Also check out the other URL which provides the VSCode instance. For access after Snowflake authentication add the following to the URL:
?tkn=secret

Now you should be able to use VScode to jump into the terminal in the Websson Runtime or change the code of the Flask app:

Do not forget to stop the HTTP server in your Websson Cloud Environment.
You do not need it anymore for now.
Once you are done playing you can clean up in Snowflake like so:
					drop service websson_service;

use role accountadmin;

drop COMPUTE POOL websson_compute_pool;
This is of course just a very simple example.
You can also deploy more complex apps that involve more sophisticated installation steps or you can have the script Git pull code from Git.
You can also provide secrets such as tokens if you want to pull from a private Git for example.
Secrets are pulled into the Websson Open Source Runtime via a different specific URL.
There are some extra steps involved in order to keep the secrets secret, however once downloaded in the Websson Open Source Runtime that will only be availabe during the startup of the container for installation purposes.
All secrets will be removed and made inaccessible once the startup routine is done within the container.
We will explore that in the next blog post how exactly this scenario works.
Next Steps:
We encourage you to play some more with this simple example, maybe you want to zip up your own app now and deploy quickly in Snowflake Container services?
If you need any help or guidance in this or any other issue, please feel free to contact us and we ill be more than happy to help.


